
Introduction
Bringing a new dog into your home is an exciting experience, but it also comes with its challenges. One of the most important decisions you’ll need to make is how to provide a comfortable and safe space for your furry friend. While dog crates are a popular solution, they can often be expensive or unsightly. That’s why we’re here to show you how to build your own DIY dog crate that not only suits your decor but also caters to the size and breed of your dog.
The Benefits of a DIY Dog Crate
A DIY dog crate offers several advantages over store-bought options. First and foremost, it allows you to customize the crate to fit your specific needs. Whether you have a large breed dog or multiple dogs, you can adjust the dimensions of the crate accordingly. Additionally, building your own dog crate can save you money compared to purchasing a pre-made one. Plus, you have the satisfaction of knowing that you created a unique and functional space for your beloved pet.
Determining the Size of Your DIY Dog Crate
Before you start building your DIY dog crate, it’s important to consider the size and breed of your dog. You want to ensure that your furry friend has enough space to stand, turn around, and lie down comfortably. Additionally, take into account any growth your dog may experience. If you have a puppy, consider how much they will grow in the coming months and years. It’s better to build a slightly larger crate now than to have to rebuild it later.
Materials Needed for Your DIY Dog Crate
To build your DIY dog crate, you’ll need a few materials. Here’s a list of what you’ll need:
-
Wood: Choose a sturdy and durable wood that is at least 1″ thick. Select grade wood or 2x4s are great options.
-
Crib Mattress: A crib mattress is an excellent choice for a dog bed as it provides comfort and familiarity for your dog.
-
Aluminum Bars: You’ll need ¾” diameter aluminum bars for the crate’s bars.
-
Wood Glue: Use non-toxic wood glue to secure the various parts of the crate together.
-
Pocket Screws: 1 ½” pocket screws will help reinforce the structure of the crate.
-
Backer Board or Plywood: Depending on the flexibility of your chosen backer board, you may need to reinforce it with ¾” plywood.
Step-by-Step Guide to Building Your DIY Dog Crate
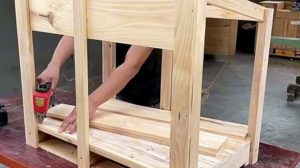
Step 1: Measuring and Cutting the Wood
Start by measuring and cutting the wood for your DIY dog crate. The sides of the crate should be made from 1″ thick wood. You’ll need to rip the wood down to the desired thickness if necessary. Remember to smooth and clean both sides of the wood for a polished finish.
Step 2: Spacing and Drilling Holes for the Bars
Next, determine the spacing for the bars of the crate. The spacing will depend on the size of your dog and their age. For larger dogs like Bentley, spacing the bars approximately 4 ½” apart should be sufficient. Use a drill press or a hand drill with a ¾” spade bit to drill holes for the bars. Make sure to align the holes on both sides of the crate to ensure the bars are perfectly aligned.
Step 3: Assembling the Crate
Now it’s time to assemble the crate. Use wood glue and 1 ½” pocket screws to secure all the parts together. Start with the base and build upwards, attaching the sides, back, and top. If necessary, reinforce the backer board with ¾” plywood for added stability.
Step 4: Adding the Mattress and Top
Once the crate is assembled, drop the crib mattress inside the frame. This will provide a comfortable sleeping space for your dog. If desired, you can also add a ¾” plywood top to the crate. Sand the entire crate, including the top, with 120, 150, and 220 grit sandpaper for a smooth finish.
Step 5: Finishing Touches
To give your DIY dog crate a polished look, consider adding edge banding to the plywood top. Apply a coat of stain and two coats of clear poly for added protection. Let the crate dry completely before allowing your dog to use it.
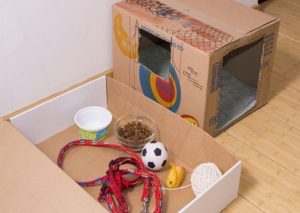
Placement and Usage of Your DIY Dog Crate
Now that your DIY dog crate is complete, it’s important to find the perfect spot for it in your home. Avoid placing the crate in drafty areas or in direct sunlight, as this can make the space too hot or too cold for your dog. The kitchen or a central location in your home is often a good choice. Remember, a crate should be a source of comfort and protection for your dog, not a place for extended confinement. Use it when necessary, such as during the night or when you’re away from home.
Conclusion
Building your own DIY dog crate is a rewarding project that offers numerous benefits. Not only can you customize the crate to suit your decor and your dog’s needs, but you can also save money in the process. By following the step-by-step guide outlined in this article, you’ll be able to create a comfortable and safe space for your furry friend. So, grab your tools and get started on building the perfect DIY dog crate today!